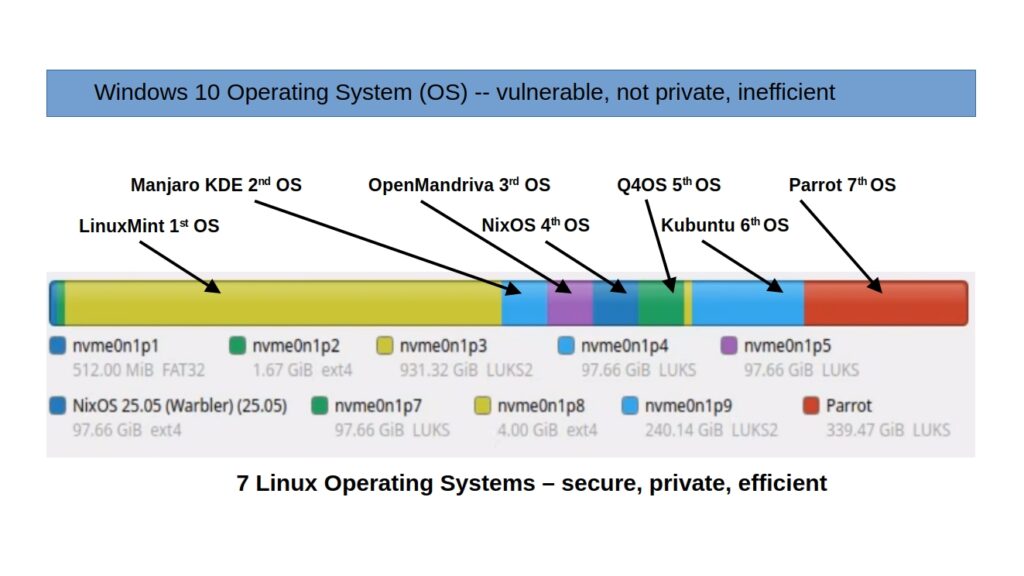
Installing Seven Linux OS As Multi-Boot
Continued from ‘Installing Two Linux OS As Dual-Boot’ https://fairwissenschaft.eu/2026/01/installing-two-linuxos-as-dual-boot/
Release 1 on 6th March 2026.
Last Edit 18th April 2026:
- Updated ‘9. BIOS Final Settings’ with explanation of why LUKS1 and LUK2 encrypted disks prompt for passphrase twice and once, respectively.
- NixOS Install 4th Linux OS: Installer only works online i.e. cannot install from live USB to computer or external disk/microSD/USB flash unless device is connected to internet.
- Kubuntu Install 6th Linux OS: Installer fails if in ‘/etc/calamares/modules/bootloader.conf’ file the line ‘installerEFIFallback: false’ is not added.
Installation: Demonstration 1 – Setup of old unsupported Windows computer
Caution: This will remove all data on your computer so backup before trying this protocol. This protocol will completely remove Windows OS, replacing it with a multiple Linux Operating Systems.
Overview:
– Problem: Old computers with 2019+ BIOS (Blue Screen) can’t run
Windows 11. Solution: Replace with Linux OS using compatible bootable
drives.
– Solution Steps:
1. Create Live Media: Use tools like Rufus or BalenaEtcher to make a
live USB/microSD from Linux ISOs. Choose ‘UEFI mode’ for compatibility.
2. First Install (Linux Mint):
– Boot from USB, select installation. Enable ‘Secure Boot’ during
setup (tools may automate this).
– This OS boots with Secure Boot enabled and is the primary system.
3. Subsequent Installs:
– For Manjaro KDE, Parrot, Kubuntu, or OpenMandriva: Use their
Calamares installer via USB/microSD.
– These systems start with Secure Boot disabled but can later enable
it using `sbsign` (details will be covered in a future tutorial).
Key Points
1. Old Hardware Compatibility: 2019+ computers lack support for modern
Windows due to outdated BIOS.
2. Bootable Media Creation: Ensure tools use UEFI to create live
drives, avoiding issues with microSD adapters.
3. Initial Installation (Linux Mint):
– Uses Ubiquity installer, enabling Secure Boot during installation.
– Guides user through enabling Secure Boot in BIOS if needed (explained
step-by-step).
4. Secondary Installations:
– Calamares-based distros install with Secure Boot off by default but
allow manual re-enablement via `sbsign`.
Keywords
– Old Windows computer
– Blue Screen BIOS
– Live USB/microSD creation tools (Rufus, BalenaEtcher)
– Secure Boot
– Ubiquity/Subiquity installer
– Calamares installer
– sbsign package
Input:
- Computer is 2019 or older, with ‘Blue Screen BIOS’ ,so its no longer supported by Windows as its not compatible with Windows 11.
- Rufus, balena etcher, mkusb, ‘dd’ command or Linux Gnome-Disks has been used to prepare ‘bootable live’ USB/microSD from official Linux OS iso files.
- (optional) For microUSB, just incase putting it in card-reader adaptor does not work, adaptor that converts microSD to USB is also available. To avoid confusion, just use USB stick for making a ‘bootable live’ USB.
- The first Linux OS Ubiquity/Subiquity installer used is LinuxMint, which installs LinuxMint as the first OS on the computer. One can also use Ubuntu OS as the first instead of LinuxMint.
- The second, third, fourth, fifth, sixth and seventh Linux OS Calamares installer used are, Manjaro KDE Linux OS, OpenMandriva Linux OS, NixOS Linux OS, Q4OS Linux OS, Kubuntu Linux OS, and Parrot Linux OS, respectively.
- BIOS, Boot order make sure USB options are first, ‘Secure Boot Disabled’, ‘UEFI’ is selected, ‘Fast Boot Disabled’, and Bitlocker related ‘Device Guard Off/Disabled’. These will can be re-enabled after all linux operating systems are installed.
Output:
- Computer with Five Linux Operating Systems (Linux OS) of two types, Ubiquity-Subuquity and Calamares.
- The first OS, LinuxMint Linux OS boots with ‘Secure Boot Enabled’.
- The remaining six, Manjaro KDE Linux OS, OpenMandriva Linux OS, NixOS Linux OS, Q4OS Linux OS, Kubuntu Linux OS, and Parrot Linux OS boot with ‘Secure Boot Disabled’. Note: These can be made to boot with ‘Secure Boot Enabled’ if one signs their grubx64.efi with MOK.priv and MOK.pem (MOK.der) using ‘sbsign’ package. Details will be demonstrated in another tutorial.
Protocol
For this discussion, we will refer to the first linux OS installed (LinuxMint OS) as ‘primary linux OS’, and all other linux OS installed thereafter we can call ‘non-primary linux OS’. In the present demo all these other ‘non-primary’ linux operating systems are installed by Ubiquity-Subuquity, while the ‘primary linux OS’ is installed by Calamares. All the installations work without active internet. If you get a prompt informing you that internet is not available, just ignore it.
| Protocol Summary | |
| From the official website (links below) for the Linux OS download ISO files, and write to USB or microSC of atleast 8GB size, using software such as Rufus, balenaEtcher or GnomeDiskUtility. After this step internet (wifi or ethernet) is not required. | |
| BIOS Initial Settings | No need to remove BIOS ‘administrator’ and ‘user’ passwords, for security its best to enable these. Disable ‘bitlocker’, ‘secure boot’, ‘fast boot’. Enable ‘UEFI’ boot and make USB and CD/DVD options top boot priority over hard disk. |
| LinuxMint OS https://linuxmint.com | Live media loaded in 3 rounds. 1st round to erase whole disk of computer (clean removal of Windows OS), 2nd round to custom install with LUKS encryption on part of the computer disk, and 3rd round to use ‘gparted’ to partition free space into 6 more parts for the remaining 6 linux operating systems. |
| Manjaro OS https://manjaro.org | Installation by using ‘Replace partition’ mode, wherein one of the 6 partitions created by gparted in LinuxMint is used. |
| OpenMandriva https://www.openmandriva.org | Installation by using ‘Replace partition’ mode, wherein one of the 6 partitions created by gparted in LinuxMint is used. |
| NixOS https://nixos.org | Installation by using ‘Replace partition’ mode, wherein one of the 6 partitions created by gparted in LinuxMint is used. |
| Q4OS https://q4os.org | Installation by using ‘Replace partition’ mode, wherein one of the 6 partitions created by gparted in LinuxMint is used. |
| Kubuntu OS https://kubuntu.org | Installation by using ‘Replace partition’ mode, wherein one of the 6 partitions created by gparted in LinuxMint is used. |
| Parrot (Home) https://www.parrotsec.org | Installation by using ‘Replace partition’ mode, wherein one of the 6 partitions created by gparted in LinuxMint is used. |
| BIOS Final Settings | No need to remove BIOS ‘administrator’ and ‘user’ passwords, for security its best to enable these. Enable ‘bitlocker’ and ‘fast boot’. If secure boot is enabled only the first LinuxMint will boot, disable secure boot and change hard disk boot order to boot other six Linux OS. Its good practice to make ‘secure boot enable’ when away from computer for security reasons, while ‘secure boot disable’ is preferred when actively using the computer to avail the advantages of a multiple Linux OS system e.g. if one Linux OS experiences cyberattack, user can switch to any of the other installed Linux OS. Enable ‘UEFI’ boot and make hard disk (choose any one of the seven Linux OS) top boot priority over USB and CD/DVD options. |
1. BIOS Initial Settings:
– BIOS: Use Arrow-Keys on keyboard and ‘Esc’ keys to move around BIOS Menu, and ‘Return/Enter’ key on keyboard to accept selection.
– BIOS ‘Main’ Tab: leaving these settings as default, usually works
– BIOS ‘Advanced’ Tab: leaving settings as default, usually works, such as leaving ‘Trusting Computing Enabled’, ‘Intel BIOS Guard Technology Enabled’, ‘Intel (VMX) Virtualization Technology Enabled’ and ‘VT-d Enabled’ usually does not interfere with installation. If problems arise try disabling ‘Trusting Computing Enabled’.
– BIOS ‘Security’ Tab: first click and select as follows ‘Key Management’ > ‘Factory Key Provision Enabled’ > ‘Restore Factory Keys’ Yes > ‘Reset To Startup Mode’ Yes > Click ‘Esc’ on keyboard > make ‘Secure Boot Disabled’
– BIOS ‘Boot’ Tab: ‘Fast Boot Disabled’ and ‘Boot Mode UEFI’. For ‘Fixed Boot Order Priorities’, please click, select with arrow-key and accept with ‘Return/Enter’ key, such that ‘USB’ boot options take the top priority, followed by ‘CD/DVD’, followed by ‘Hard Disk’.
– BIOS Other Security: Bitlocker related ‘Device Guard Off/Disabled’.
– BIOS ‘Save’ Tab: Now insert your bootable live linux OS USB/microSD into the computer slot. Click ‘Save and Exit’ and accept with Return/Enter key. If the computer does not now boot into the live linux OS USB/microSD, Power Off computer, wait for 5 min, insert your bootable live linux OS USB/microSD into the computer slot and Power On computer.
– BIOS Settings: All security settings can be re-enabled after all linux operating systems are installed. Except, ‘Secure Boot’ may need to be disabled for booting other than the primary system, without MOK key setup.
2a. LinuxMint Install Round 1
– BIOS Settings: No need to change anything in the ‘Secure Boot Keys’ tab, it was already done in the Boot Initial Settings, just ensure Boot order USB options are first, ‘Secure Boot Disabled’, ‘UEFI’ is selected, ‘Fast Boot Disabled’, and Bitlocker related ‘Device Guard Off/Disabled’. Put LinuxMint OS live USB in USB slot before clicking ‘Save and Exit’ on BIOS. As ‘USB Hard-Disk’, ‘USB CD/DVD’ and ‘CD/DVD’ are top options ahead of Hard Disk of computer, computer will boot into the USB/microSD live LinuxMint OS.
– Before Desktop and Desktop Icons appear, please note that the screen may show the following while the Desktop live environment configures for live boot, don’t be alarmed or force shut-down/power-off of the computer:
– It may happen that a ‘-‘ icon appears while rest of screen remains black, then a bunch of codes auto-run for system checks and settings configuration, please be patient and let this code run complete (takes a maximum of 2 minutes).
– KDE Plasma desktop environment takes longer to load in comparison to XFCE environment. So before KDE Plasma desktop loads, the screen can go blank for several minutes after displaying message ‘configuring KDE plasma environment’. Here, after several minutes say 5 minutes, move around your mouse randomly, then place the mouse somewhere safe like middle of the blank screen, and press ‘Enter/Return’ key, this action seems to help KDE plasma environment load.
– Once the Desktop appears and Welcome screen appears, it may take a while for the ‘Installer’ icon and other desktop icons to appear, please be patient and wait for these to appear (takes a maximum of 2 minutes).
– Close the welcome screen by clicking on ‘x’ of the welcome message window.
– Click Installer > Check ‘Install Multimedia Codes’ > Select ‘Erase disk and install Linux Mint’ option by clicking ‘Advanced Features’, selecting ‘Use LVM with the new Linux Mint installation’ and ‘Encrypt the new Linux Mint installation for security’ > Click ‘OK’ > Click Continue > Type twice disk password under ‘Choose a security key’ > Click ‘Install Now’ > Select disk e.g. /dev/nvme0n1 to install in from drop-down menu > Click ‘Install Now’ > Follow prompts to choose language, location and keyboard > Restart > When prompted to ‘Please remove installer…’, remove USB/SD live LinuxMint and press ‘Enter/Return’ key, this will reboot the computer into the newly installed LinuxMint OS on the computer disk.
– Computer will reboot into the primary Linux OS, here installed LinuxMint OS as LinuxMint OS live USB has been removed.
– Type disk encryption key (first password) and then login with user password.
– Open Terminal, and type
sudo systemctl reboot --firmware-setupwhich will take you to BIOS Settings.
– BIOS ‘Boot’ Tab: Click ‘UEFI Hard Disk Drive BBS Priorities’ please click, ‘Boot Option 1’ select with arrow-key and accept with ‘Return/Enter’ key, such that ‘Boot Option 1’ is ‘LinuxMint’. This will boot primary linux OS ‘LinuxMint’ as default linux OS, while ‘Secure Boot Disabled’ and even while ‘Secure Boot Enabled’.
– ‘BIOS’ DO NOT Exit: To install next Linux OS, continue to next step or if this is the last linux OS you are installing continue to end of 7 linux OS installations for instructions on how to re-enable security BIOS settings.
2b. LinuxMint Install Round 2
– BIOS Settings: No need to change anything in the ‘Secure Boot Keys’ tab, it was already done in the Boot Initial Settings, just ensure Boot order USB options are first, ‘Secure Boot Disabled’, ‘UEFI’ is selected, ‘Fast Boot Disabled’, and Bitlocker related ‘Device Guard Off/Disabled’. Put LinuxMint OS live USB in USB slot before clicking ‘Save and Exit’ on BIOS. As ‘USB Hard-Disk’, ‘USB CD/DVD’ and ‘CD/DVD’ are top options ahead of Hard Disk of computer, computer will boot into the USB/microSD live LinuxMint OS.
– Click Installer > Check ‘Install Multimedia Codes’ > Select ‘Something Else’ option > Click ‘Continue’ > Now make the following manual changes, to the disk e.g. /dev/nvme0n1 on which LinuxMint Install Round 1 was done.
#Main LinuxMint OS LUKS Partition e.g. /dev/nvme0n1p3 (Delete ‘-‘, Encryption ‘+’, Change).
– Delete with ‘-‘ the luks partition, which you can identify by size, it will be the largest partition on the disk where you installed LinuxMint OS in ‘LinuxMint Install Round 1’.
– Now while still on that largest partition labeled ‘free space’, click ‘+’ and adjust how much space you want for this first LinuxMint OS, while the remaining will be used for the remaining linux operating systems. Make sure to select ‘beginning of space’ and ‘Primary’, then click ‘ok’. In ‘Use as’ select ‘physical volume for encryption’ and type memorable encryption key (its a type of password), then click ‘ok’. This ‘physical volume for encryption’ is where LinuxMint OS will be installed, don’t worry about the remaining free space now. Here, 50% of total disk space e.g. approximately 1TB out of approximately 2TB, was used as ‘physical volume for encryption’ to install LinuxMint OS, just because its easy to identify it as its the largest partition by size, but feel free to make it the smallest partition or medium sized partition if you so please, in which case carefully note the partition label e.g. /dev/nvme0n1p3.
– Now, instead of the largest partition labeled ‘free space’ click on the newly created largest ‘-crypt ext4’ partition e.g. /dev/mapper/nvme0n1p3_crypt. This was created in the step above. Click ‘change’, select ‘ext4 journaling file system’, make sure ‘Format the partition’ is checked and make mount point ‘/’.
#Boot LinuxMint OS e.g. /dev/nvme0n1p2 (Change).
– For the boot partition ext4 created earlier in first round of installation of LinuxMint OS, click ‘change’, in ‘Use as’ select ‘ext4 journaling file system’, make sure to check ‘Format the partition’ and select ‘mount point’ as ‘/boot’, and click ‘ok’.
#EFI partition LinuxMint OS e.g. /dev/nvme0n1p1 (Do Nothing).
– For the EFI partition, leave as is do nothing, the linuxmint installer will automatically detect it.
– Select disk to install in from drop-down menu > Click ‘Install Now’ > Follow prompts to choose language, location and keyboard > Restart > When prompted to ‘Please remove installer…’, remove USB/SD live LinuxMint and press ‘Enter/Return’ key, this will reboot the computer into the newly installed LinuxMint OS on the computer disk.
– Computer will reboot into the primary Linux OS, here installed LinuxMint OS as LinuxMint OS live USB has been removed.
– Type disk encryption key (first password) and then login with user password.
– Open Terminal, and type
sudo systemctl reboot --firmware-setupwhich will take you to BIOS Settings.
– BIOS ‘Boot’ Tab: Click ‘UEFI Hard Disk Drive BBS Priorities’ please click, ‘Boot Option 1’ select with arrow-key and accept with ‘Return/Enter’ key, such that ‘Boot Option 1’ is ‘LinuxMint’. This will boot primary linux OS ‘LinuxMint’ as default linux OS, while ‘Secure Boot Disabled’ and even while ‘Secure Boot Enabled’.
– ‘BIOS’ DO NOT Exit: To install next Linux OS, continue to next step or if this is the last linux OS you are installing continue to end of 7 linux OS installations for instructions on how to re-enable security BIOS settings.
2c. LinuxMint Install Round 3
– BIOS Settings: No need to change anything in the ‘Secure Boot Keys’ tab, it was already done in the Boot Initial Settings, just ensure Boot order USB options are first, ‘Secure Boot Disabled’, ‘UEFI’ is selected, ‘Fast Boot Disabled’, and Bitlocker related ‘Device Guard Off/Disabled’. Put LinuxMint OS live USB in USB slot before clicking ‘Save and Exit’ on BIOS. As ‘USB Hard-Disk’, ‘USB CD/DVD’ and ‘CD/DVD’ are top options ahead of Hard Disk of computer, computer will boot into the USB/microSD live LinuxMint OS.
– Search for ‘gparted’ app/software, and click to open.
– Gparted: From drop-down menu on right select the correct disk /dev/nvme0n1, and click on the ‘unallocated’ free space. This free space is the remaining free space created in LinuxMint Install Round 1 after ‘physical volume for encryption’ step.
– Gparted: Right click on the ‘unallocated’ free space, click ‘New’ and then resize to desired size of disk partition, ‘Create as’ should be ‘Primary Partition’ and ‘File system’ should be ‘ext4’ format for next Linux OS install. After each resize a new ext4 partition is created and a remaining free space is created. Repeat this process, to make partitions for each remaining Linux OS. Presently, as 6 linux operating systems will be installed in addition to LinuxMint OS already installed, the free space will be divided into 5 parts of equal or variable size, while the 6th partition is left ‘unallocated’ without formatting, e.g. the 50% ‘unallocated’ free space of approximately 1TB here gets divided into 5 parts of approximately 100GB, 100GB, 100GB, 100GB, 250GB and the remaining space is left as is ‘unallocated’ free space of approximately 250GB.
– Gparted: Click ‘Apply All Operations’ icon ‘right tick sign’ > Then Click ‘Apply’ > This will show ‘Applying pending operations’ so wait for the process to complete > Click ‘Close’ > Wait for Gparted to finish any pending operations and only then > Close Gparted app by clicking on the ‘x’ at top-right.
– Power-Off computer by clicking ‘Shut-Down’ computer > When prompted to ‘Please remove installer…’, remove USB/SD live LinuxMint and press ‘Enter/Return’ key, this will ‘Shut-Down’ the computer.
– Power-On computer, this will reboot the computer into the previously installed LinuxMint OS in Round 2 on the computer disk.
– Computer will reboot into the primary Linux OS, here installed LinuxMint OS as LinuxMint OS live USB has been removed.
– Type disk encryption key (first password) and then login with user password.
– Open Terminal, and type
sudo systemctl reboot --firmware-setupwhich will take you to BIOS Settings.
– BIOS ‘Boot’ Tab: Click ‘UEFI Hard Disk Drive BBS Priorities’ please click, ‘Boot Option 1’ select with arrow-key and accept with ‘Return/Enter’ key, such that ‘Boot Option 1’ is ‘LinuxMint’. This will boot primary linux OS ‘LinuxMint’ as default linux OS, while ‘Secure Boot Disabled’ and even while ‘Secure Boot Enabled’.
– ‘BIOS’ DO NOT Exit: To install next Linux OS, continue to next step or if this is the last linux OS you are installing continue to end of 7 linux OS installations for instructions on how to re-enable security BIOS settings.
3. Manjaro KDE Install 2nd Linux OS
– BIOS Settings: No need to change anything in the ‘Secure Boot Keys’ tab, it was already done in the Boot Initial Settings, just ensure Boot order USB options are first, ‘Secure Boot Disabled’, ‘UEFI’ is selected, ‘Fast Boot Disabled’, and Bitlocker related ‘Device Guard Off/Disabled’. Put Manjaro KDE OS live USB in USB slot before clicking ‘Save and Exit’ on BIOS. As ‘USB Hard-Disk’, ‘USB CD/DVD’ and ‘CD/DVD’ are top options ahead of Hard Disk of computer, computer will boot into the USB/microSD live Manjaro KDE OS. No need to disable ‘administrator’ and ‘user’ security password prompt, keep them on just type these passwords to enter BIOS settings.
– Before Desktop and Desktop Icons appear, please note that the screen may show the following while the Desktop live environment configures for live boot, don’t be alarmed or force shut-down/power-off of the computer:
– It may happen that a ‘-‘ icon appears while rest of screen remains black, then a bunch of codes auto-run for system checks and settings configuration, please be patient and let this code run complete (takes a maximum of 2 minutes).
– (Optional 1) KDE Plasma desktop environment takes longer to load in comparison to XFCE environment. So before KDE Plasma desktop loads, the screen can go blank for several minutes after displaying message ‘configuring KDE plasma environment’. Here, after several minutes say 5 minutes, move around your mouse randomly, then place the mouse somewhere safe like middle slightly right (center-right) of the screen, and press ‘Enter/Return’ key, this action seems to help KDE plasma environment load.
– (Optional 1) Some other non-KDE Plasma desktop environment e.g. NixOS and OpenMandriva also take longer to load in comparison to XFCE environment. So before the desktop environment loads, the screen can go black or blue or pink displaying, just a circular logo (NixOS) or nothing. ere, after several minutes say 5 minutes, move around your mouse randomly, then place the mouse somewhere safe like middle slightly right (center-right) of the screen, and press ‘Enter/Return’ key, this action seems to help these non-KDE desktop environments load.
– Once the Desktop appears and Welcome screen appears, it may take a while for the ‘Installer’ icon and other desktop icons to appear, please be patient and wait for these to appear (takes a maximum of 2 minutes).
– During install if live Linux OS logs out, then log-in again using the default password that is same as the username, e.g. ‘manjaro’ default username default password is ‘manjaro’, ‘parrot’ default username default password is ‘parrot’, and ‘openmandriva’ default username default password is ‘openmandriva’ etc.
– Close the welcome screen by clicking on ‘x’ of the welcome message window.
– Terminal: Open ‘Konsole’ app/software. Then sequentially type the following commands to open, edit and save the ‘bootloader.conf’ file.
cd /etc/calamares/moduleslssudo nano bootloader.conf– Terminal: In the last line of the file change
installerEFIFallback: trueto
installerEFIFallback: falseOn keyboard, hit ‘Ctrl+X’, ‘y’ and ‘Enter/Return’ key. Here are the details about how to use ‘nano’ text editor,
-USE ARROW KEYS ON YOUR KEYBOARD TO NAVIGATE bootloader.conf FILE
-AFTER EDITING THE FILE IN NANO,
-PRESS Ctrl+X ON YOUR KEYBOARD
-THEN PRESS ‘Y’ ON YOUR KEYBOARD
-THEN PRESS ‘RETURN/ENTER’ KEY ON YOUR KEYBOARD
– Terminal: type the following command to close Terminal.
exit– Click Installer ‘Install Manjaro Linux’ > Then complete the calamares installer as follows:
– Under ‘Location’ Tab and ‘Keyboard’ Tab follow prompts to choose language, location and keyboard > Click ‘Next’
– Under ‘Partitions’ Tab make sure correct disk is selected under ‘Select storage device’ e.g. /dev/nvme0n1 > Check ‘Replace a Partition’ > Select ‘ext4’ option > Click and select disk partition where you want to install Manjaro KDE OS e.g. /dev/nvme0n1p4 > Check ‘Encrypt system’ and type a password for the partition (called encryption partition) twice > Click ‘Next’
– Under ‘Users’ Tab create ‘name’, ‘username’, ‘computer name’ (ok to make all 3 same) and password; click and check ‘Use the same password for the administrator account’ > Click ‘Next’
– Under ‘Office Suite’ Tab select ‘Free Office’ or ‘LibreOffice’ > Click ‘Next’
– Under ‘Summary’ Tab click ‘Install’ and ‘Install Now’
– Under ‘Install’ Tab just wait to let installer run and complete
– Under ‘Finish’ Tab click adn check ‘Restart now’ and click ‘Done’.
– Computer will reboot into the Linux OS installed in previous round, installed Manjaro KDE or Manjaro KDE OS live USB (it veries based on computer manufacturer’s BIOS software defaults).
– If/When prompted, type disk encryption key (first password) and then login with user password.
– On the Linux OS that opens open Terminal such as on the Manjaro KDE OS USB Open Terminal (called Konsole), and type
systemctl reboot --firmware-setupwhich will take you to BIOS Settings. No need to disable ‘administrator’ and ‘user’ security password prompt, keep them on just type these passwords to enter BIOS settings.
– BIOS ‘Boot’ Tab: Click ‘UEFI Hard Disk Drive BBS Priorities’ please click, ‘Boot Option 1’ select with arrow-key and accept with ‘Return/Enter’ key, such that ‘Boot Option 1’ is ‘Manjaro KDE’. This will boot non-primary linux OS ‘Manjaro KDE’ as default linux OS, while ‘Secure Boot Disabled’ is set. To boot into this non-primary ‘Manjaro KDE’ linux OS with ‘Secure Boot Enabled’ you need to add MOK security signature to the grubx64.efi boot files (this will be explained in detail in another post as it requires extensive coding).
– ‘BIOS’ DO NOT Exit: To install next Linux OS, continue to next step or if this is the last linux OS you are installing continue to end of 7 linux OS installations for instructions on how to re-enable security BIOS settings.
4. OpenMandriva Install 3rd Linux OS
– BIOS Settings: No need to change anything in the ‘Secure Boot Keys’ tab, it was already done in the Boot Initial Settings, just ensure Boot order USB options are first, ‘Secure Boot Disabled’, ‘UEFI’ is selected, ‘Fast Boot Disabled’, and Bitlocker related ‘Device Guard Off/Disabled’. Put OpenMandriva OS live USB in USB slot before clicking ‘Save and Exit’ on BIOS. As ‘USB Hard-Disk’, ‘USB CD/DVD’ and ‘CD/DVD’ are top options ahead of Hard Disk of computer, computer will boot into the USB/microSD live OpenMandriva OS. No need to disable ‘administrator’ and ‘user’ security password prompt, keep them on just type these passwords to enter BIOS settings.
– Before Desktop and Desktop Icons appear, please note that the screen may show the following while the Desktop live environment configures for live boot, don’t be alarmed or force shut-down/power-off of the computer:
– It may happen that a ‘-‘ icon appears while rest of screen remains black, then a bunch of codes auto-run for system checks and settings configuration, please be patient and let this code run complete (takes a maximum of 2 minutes).
– (Optional 1) KDE Plasma desktop environment takes longer to load in comparison to XFCE environment. So before KDE Plasma desktop loads, the screen can go blank for several minutes after displaying message ‘configuring KDE plasma environment’. Here, after several minutes say 5 minutes, move around your mouse randomly, then place the mouse somewhere safe like middle slightly right (center-right) of the screen, and press ‘Enter/Return’ key, this action seems to help KDE plasma environment load.
– (Optional 1) Some other non-KDE Plasma desktop environment e.g. NixOS and OpenMandriva also take longer to load in comparison to XFCE environment. So before the desktop environment loads, the screen can go black or blue or pink displaying, just a circular logo (NixOS) or nothing. ere, after several minutes say 5 minutes, move around your mouse randomly, then place the mouse somewhere safe like middle slightly right (center-right) of the screen, and press ‘Enter/Return’ key, this action seems to help these non-KDE desktop environments load.
– Once the Desktop appears and Welcome screen appears, it may take a while for the ‘Installer’ icon and other desktop icons to appear, please be patient and wait for these to appear (takes a maximum of 2 minutes).
– During install if live Linux OS logs out, then log-in again using the default password that is same as the username, e.g. ‘manjaro’ default username default password is ‘manjaro’, ‘parrot’ default username default password is ‘parrot’, and ‘openmandriva’ default username default password is ‘openmandriva’ etc.
– Close the welcome screen by clicking on ‘x’ of the welcome message window.
– Terminal: Open ‘Konsole’ app/software. Then sequentially type the following commands to open, edit and save the ‘bootloader.conf’ file.
cd /etc/calamares/moduleslssudo nano bootloader.conf– Terminal: In the last line of the file change
installerEFIFallback: trueto
installerEFIFallback: falseOn keyboard, hit ‘Ctrl+X’, ‘y’ and ‘Enter/Return’ key. Here are the details about how to use ‘nano’ text editor,
-USE ARROW KEYS ON YOUR KEYBOARD TO NAVIGATE bootloader.conf FILE
-AFTER EDITING THE FILE IN NANO,
-PRESS Ctrl+X ON YOUR KEYBOARD
-THEN PRESS ‘Y’ ON YOUR KEYBOARD
-THEN PRESS ‘RETURN/ENTER’ KEY ON YOUR KEYBOARD
– Terminal: type the following command to close Terminal.
exit– Click Installer ‘Install OpenMandriva Lx’ > Then complete the calamares installer as follows:
– Under ‘Location’ Tab and ‘Keyboard’ Tab follow prompts to choose language, location and keyboard > Click ‘Next’
– Under ‘Partitions’ Tab make sure correct disk is selected under ‘Select storage device’ e.g. /dev/nvme0n1 > Check ‘Replace a Partition’ > Select ‘ext4’ option > Click and select disk partition where you want to install OpenMandriva OS e.g. /dev/nvme0n1p5 > Check ‘Encrypt system’ and type a password for the partition (called encryption partition) twice > Click ‘Next’
– Under ‘Users’ Tab create ‘name’, ‘username’, ‘computer name’ (ok to make all 3 same) and password; click and check ‘Use the same password for the administrator account’ > Click ‘Next’
– Under ‘Summary’ Tab click ‘Install’ and ‘Install Now’
– Under ‘Install’ Tab just wait to let installer run and complete
– Under ‘Finish’ Tab click and check ‘Restart now’ and click ‘Done’.
– Computer will reboot into the Linux OS installed in previous round, installed OpenMandriva or OpenMandriva OS live USB (it veries based on computer manufacturer’s BIOS software defaults).
– If/When prompted, type disk encryption key (first password) and then login with user password.
– On the Linux OS that opens open Terminal such as on OpenMandriva OS USB Open Terminal (called Console), and type
systemctl reboot --firmware-setupwhich will take you to BIOS Settings. No need to disable ‘administrator’ and ‘user’ security password prompt, keep them on just type these passwords to enter BIOS settings.
– BIOS ‘Boot’ Tab: Click ‘UEFI Hard Disk Drive BBS Priorities’ please click, ‘Boot Option 1’ select with arrow-key and accept with ‘Return/Enter’ key, such that ‘Boot Option 1’ is ‘OpenMandriva’. This will boot non-primary linux OS ‘OpenMandriva’ as default linux OS, while ‘Secure Boot Disabled’ is set. To boot into this non-primary ‘OpenMandriva’ linux OS with ‘Secure Boot Enabled’ you need to add MOK security signature to the grubx64.efi boot files (this will be explained in detail in another post as it requires extensive coding).
– ‘BIOS’ DO NOT Exit: To install next Linux OS, continue to next step or if this is the last linux OS you are installing continue to end of 7 linux OS installations for instructions on how to re-enable security BIOS settings.
5. NixOS Install 4th Linux OS
– Edit: 28th March 2026: Please note this installer only works online i.e. cannot install from live USB to computer or external disk/microSD/USB flash unless device is connected to internet. So consider skipping NixOS and installing Debian OS instead. Please not it is also possible to install any of the other Calamares based linux OS installers discussed here, but it would require reinstalling ‘grub’ and updating bootmenu entry with non-default name to avoid confusion. In the Ubuntu Linux OS installation and Linux OS installation on external USB, this code will be discussed.
– BIOS Settings: No need to change anything in the ‘Secure Boot Keys’ tab, it was already done in the Boot Initial Settings, just ensure Boot order USB options are first, ‘Secure Boot Disabled’, ‘UEFI’ is selected, ‘Fast Boot Disabled’, and Bitlocker related ‘Device Guard Off/Disabled’. Put NixOS OS live USB in USB slot before clicking ‘Save and Exit’ on BIOS. As ‘USB Hard-Disk’, ‘USB CD/DVD’ and ‘CD/DVD’ are top options ahead of Hard Disk of computer, computer will boot into the USB/microSD live NixOS OS. No need to disable ‘administrator’ and ‘user’ security password prompt, keep them on just type these passwords to enter BIOS settings.
– Before Desktop and Desktop Icons appear, please note that the screen may show the following while the Desktop live environment configures for live boot, don’t be alarmed or force shut-down/power-off of the computer:
– It may happen that a ‘-‘ icon appears while rest of screen remains black, then a bunch of codes auto-run for system checks and settings configuration, please be patient and let this code run complete (takes a maximum of 2 minutes).
– (Optional 1) KDE Plasma desktop environment takes longer to load in comparison to XFCE environment. So before KDE Plasma desktop loads, the screen can go blank for several minutes after displaying message ‘configuring KDE plasma environment’. Here, after several minutes say 5 minutes, move around your mouse randomly, then place the mouse somewhere safe like middle slightly right (center-right) of the screen, and press ‘Enter/Return’ key, this action seems to help KDE plasma environment load.
– (Optional 1) Some other non-KDE Plasma desktop environment e.g. NixOS and OpenMandriva also take longer to load in comparison to XFCE environment. So before the desktop environment loads, the screen can go black or blue or pink displaying, just a circular logo (NixOS) or nothing. ere, after several minutes say 5 minutes, move around your mouse randomly, then place the mouse somewhere safe like middle slightly right (center-right) of the screen, and press ‘Enter/Return’ key, this action seems to help these non-KDE desktop environments load.
– Once the Desktop appears and Welcome screen appears, it may take a while for the ‘Installer’ icon and other desktop icons to appear, please be patient and wait for these to appear (takes a maximum of 2 minutes).
– During install if live Linux OS logs out, then log-in again using the default password that is same as the username, e.g. ‘manjaro’ default username default password is ‘manjaro’, ‘parrot’ default username default password is ‘parrot’, and ‘openmandriva’ default username default password is ‘openmandriva’ etc.
– Close the ‘NixOS Installer’ welcome screen by clicking on ‘x’ of the welcome message window. When prompted ‘Cancel installation?’ click ‘Yes’.
– The NixOS desktop interface is slightly different from the others, because in most of the other linux OS the desktop icons and dock, display by default but for ‘NixOS’ these icons stay hidden, only when ‘Windows Key’ is pressed on the keyboard all the apps and icons show up. NixOS does this to maximize available space for opened apps, and the trade-off is that the app icons are not displayed on desktop or dock at all times.
– Terminal: Open ‘Console’ app/software. Then sequentially type the following commands to open, edit and save the ‘configuration.nix’ file.
cd /etc/nixos/lssudo nano configuration.nix– Terminal: To prevent NixOS installer and bootloader from modifying EFI boot variables, in the last line of the file open in nade add the following line,
{ boot.loader.efi.canTouchEfiVariables = false;}– On keyboard, hit ‘Ctrl+X’, ‘y’ and ‘Enter/Return’ key. Here are the details about how to use ‘nano’ text editor,
-USE ARROW KEYS ON YOUR KEYBOARD TO NAVIGATE configuration.nix FILE
-AFTER EDITING THE FILE IN NANO,
-PRESS Ctrl+X ON YOUR KEYBOARD
-THEN PRESS ‘Y’ ON YOUR KEYBOARD
-THEN PRESS ‘RETURN/ENTER’ KEY ON YOUR KEYBOARD
– Terminal: type the following command to close Terminal.
exit– Click Installer for NixOS labeled ‘Install System’ > Then complete the calamares installer as follows:
– Under ‘Location’ Tab and ‘Keyboard’ Tab follow prompts to choose language, location and keyboard > Click ‘Next’
– Under ‘Users’ Tab create ‘name’, ‘username’, ‘computer name’ (ok to make all 3 same) and password; click and check ‘Use the same password for the administrator account’ > Click ‘Next’
– Under ‘Desktop’ select ‘Gnome’. You can also choose other Desktop environment types, but with NixOS, I have not tested the others > Click ‘Next’
– Under ‘Unfree Software’ check by clicking ‘Allow unfree software’ to allow the computer hardware on your computer to work > Click ‘Next’
– Under ‘Partitions’ Tab make sure correct disk is selected under ‘Select storage device’ e.g. /dev/nvme0n1 > Check ‘Replace a Partition’ no selection of ‘ext4’ option is available in current version of the installer but if its available in future versions choose ‘ext4’ > Click and select disk partition where you want to install NixOS OS e.g. /dev/nvme0n1p6 or ‘free space’> Check ‘Encrypt system’ and type a password for the partition (called encryption partition) twice > Click ‘Next’
– Under ‘Summary’ Tab click ‘Install’. If prompted click ‘Install Now’.
– Under ‘Install’ Tab just wait to let installer run and complete
– Under ‘Finish’ Tab click and check ‘Restart now’ and click ‘Done’.
– Computer will reboot into the Linux OS installed in previous round, installed OpenMandriva or OpenMandriva OS live USB (it veries based on computer manufacturer’s BIOS software defaults).
– If/When prompted, type disk encryption key (first password) and then login with user password.
– On the Linux OS that opens open Terminal such as on the NixOS OS USB Open Terminal (called Console), and type
systemctl reboot --firmware-setupwhich will take you to BIOS Settings. No need to disable ‘administrator’ and ‘user’ security password prompt, keep them on just type these passwords to enter BIOS settings.
– BIOS ‘Boot’ Tab: Click ‘UEFI Hard Disk Drive BBS Priorities’ please click, ‘Boot Option 1’ select with arrow-key and accept with ‘Return/Enter’ key, such that ‘Boot Option 1’ is ‘NixOS’. This will boot non-primary linux OS ‘NixOS’ as default linux OS, while ‘Secure Boot Disabled’ is set. To boot into this non-primary ‘NixOS’ linux OS with ‘Secure Boot Enabled’ you need to add MOK security signature to the grubx64.efi boot files (this will be explained in detail in another post as it requires extensive coding).
– ‘BIOS’ DO NOT Exit: To install next Linux OS, continue to next step or if this is the last linux OS you are installing continue to end of 7 linux OS installations for instructions on how to re-enable security BIOS settings.
6. Q4OS Install 5th Linux OS
– BIOS Settings: No need to change anything in the ‘Secure Boot Keys’ tab, it was already done in the Boot Initial Settings, just ensure Boot order USB options are first, ‘Secure Boot Disabled’, ‘UEFI’ is selected, ‘Fast Boot Disabled’, and Bitlocker related ‘Device Guard Off/Disabled’. Put Q4OS OS live USB in USB slot before clicking ‘Save and Exit’ on BIOS. As ‘USB Hard-Disk’, ‘USB CD/DVD’ and ‘CD/DVD’ are top options ahead of Hard Disk of computer, computer will boot into the USB/microSD live Q4OS OS. No need to disable ‘administrator’ and ‘user’ security password prompt, keep them on just type these passwords to enter BIOS settings.
– Before Desktop and Desktop Icons appear, please note that the screen may show the following while the Desktop live environment configures for live boot, don’t be alarmed or force shut-down/power-off of the computer:
– It may happen that a ‘-‘ icon appears while rest of screen remains black, then a bunch of codes auto-run for system checks and settings configuration, please be patient and let this code run complete (takes a maximum of 2 minutes).
– (Optional 1) KDE Plasma desktop environment takes longer to load in comparison to XFCE environment. So before KDE Plasma desktop loads, the screen can go blank for several minutes after displaying message ‘configuring KDE plasma environment’. Here, after several minutes say 5 minutes, move around your mouse randomly, then place the mouse somewhere safe like middle slightly right (center-right) of the screen, and press ‘Enter/Return’ key, this action seems to help KDE plasma environment load.
– (Optional 1) Some other non-KDE Plasma desktop environment e.g. NixOS and OpenMandriva also take longer to load in comparison to XFCE environment. So before the desktop environment loads, the screen can go black or blue or pink displaying, just a circular logo (NixOS) or nothing. ere, after several minutes say 5 minutes, move around your mouse randomly, then place the mouse somewhere safe like middle slightly right (center-right) of the screen, and press ‘Enter/Return’ key, this action seems to help these non-KDE desktop environments load.
– During install if live Linux OS logs out, then log-in again using the default password that is same as the username, e.g. ‘manjaro’ default username default password is ‘manjaro’, ‘parrot’ default username default password is ‘parrot’, and ‘openmandriva’ default username default password is ‘openmandriva’ etc.
– Close the welcome screen by clicking on ‘x’ of the welcome message window.
– Terminal: Open ‘Konsole’ app/software. Then sequentially type the following commands to open, edit and save the ‘bootloader.conf’ file.
cd /etc/calamares/moduleslssudo nano bootloader.conf– Terminal: In the last line of the file change
installerEFIFallback: trueto
installerEFIFallback: falseOn keyboard, hit ‘Ctrl+X’, ‘y’ and ‘Enter/Return’ key. Here are the details about how to use ‘nano’ text editor,
-USE ARROW KEYS ON YOUR KEYBOARD TO NAVIGATE bootloader.conf FILE
-AFTER EDITING THE FILE IN NANO,
-PRESS Ctrl+X ON YOUR KEYBOARD
-THEN PRESS ‘Y’ ON YOUR KEYBOARD
-THEN PRESS ‘RETURN/ENTER’ KEY ON YOUR KEYBOARD
– Terminal: type the following command to close Terminal.
exit– Click Installer ‘Install Q4OS Linux’ > Then complete the calamares installer as follows:
– Under ‘Location’ Tab and ‘Keyboard’ Tab follow prompts to choose language, location and keyboard > Click ‘Next’
– Under ‘Software’ Tab choose ‘Q4OS Desktop’ > Click ‘Next’
– Under ‘Partitions’ Tab make sure correct disk is selected under ‘Select storage device’ e.g. /dev/nvme0n1 > Check ‘Replace a Partition’ > Select ‘ext4’ option > Click and select disk partition where you want to install Q4OS OS e.g. /dev/nvme0n1p7 > Check ‘Encrypt system’ and type a password for the partition (called encryption partition) twice > Click ‘Next’
– Under ‘Users’ Tab create ‘name’, ‘username’, ‘computer name’ (ok to make all 3 same) and password; click and check ‘Use the same password for the administrator account’ > Click ‘Next’
– Under ‘Office Suite’ Tab select ‘Free Office’ or ‘LibreOffice’ > Click ‘Next’
– Under ‘Summary’ Tab click ‘Install’ and if ‘Install Now’ prompt appears click it.
– Under ‘Install’ Tab just wait to let installer run and complete
– Under ‘Finish’ Tab click adn check ‘Restart now’ and click ‘Done’.
– Computer will reboot into the Linux OS installed in previous round, installed Q4OS or Q4OS OS live USB (it veries based on computer manufacturer’s BIOS software defaults).
– If/When prompted, type disk encryption key (first password) and then login with user password.
– On the Linux OS that opens open Terminal such as on Q4OS OS USB Open Terminal (called Konsole), and type
systemctl reboot --firmware-setupwhich will take you to BIOS Settings. No need to disable ‘administrator’ and ‘user’ security password prompt, keep them on just type these passwords to enter BIOS settings. No need to disable ‘administrator’ and ‘user’ security password prompt, keep them on just type these passwords to enter BIOS settings.
– BIOS ‘Boot’ Tab: Click ‘UEFI Hard Disk Drive BBS Priorities’ please click, ‘Boot Option 1’ select with arrow-key and accept with ‘Return/Enter’ key, such that ‘Boot Option 1’ is ‘Q4OS_Andromeda’. This will boot non-primary linux OS ‘Q4OS’ as default linux OS, while ‘Secure Boot Disabled’ is set. To boot into this non-primary ‘Q4OS’ linux OS with ‘Secure Boot Enabled’ you need to add MOK security signature to the grubx64.efi boot files (this will be explained in detail in another post as it requires extensive coding).
– ‘BIOS’ DO NOT Exit: To install next Linux OS, continue to next step or if this is the last linux OS you are installing continue to end of 7 linux OS installations for instructions on how to re-enable security BIOS settings.
7. Kubuntu Install 6th Linux OS
– BIOS Settings: No need to change anything in the ‘Secure Boot Keys’ tab, it was already done in the Boot Initial Settings, just ensure Boot order USB options are first, ‘Secure Boot Disabled’, ‘UEFI’ is selected, ‘Fast Boot Disabled’, and Bitlocker related ‘Device Guard Off/Disabled’. Put Kubuntu OS live USB in USB slot before clicking ‘Save and Exit’ on BIOS. As ‘USB Hard-Disk’, ‘USB CD/DVD’ and ‘CD/DVD’ are top options ahead of Hard Disk of computer, computer will boot into the USB/microSD live Kubuntu OS. No need to disable ‘administrator’ and ‘user’ security password prompt, keep them on just type these passwords to enter BIOS settings.
– Before Desktop and Desktop Icons appear, please note that the screen may show the following while the Desktop live environment configures for live boot, don’t be alarmed or force shut-down/power-off of the computer:
– It may happen that a ‘-‘ icon appears while rest of screen remains black, then a bunch of codes auto-run for system checks and settings configuration, please be patient and let this code run complete (takes a maximum of 2 minutes).
– (Optional 1) KDE Plasma desktop environment takes longer to load in comparison to XFCE environment. So before KDE Plasma desktop loads, the screen can go blank for several minutes after displaying message ‘configuring KDE plasma environment’. Here, after several minutes say 5 minutes, move around your mouse randomly, then place the mouse somewhere safe like middle slightly right (center-right) of the screen, and press ‘Enter/Return’ key, this action seems to help KDE plasma environment load.
– (Optional 1) Some other non-KDE Plasma desktop environment e.g. NixOS and OpenMandriva also take longer to load in comparison to XFCE environment. So before the desktop environment loads, the screen can go black or blue or pink displaying, just a circular logo (NixOS) or nothing. ere, after several minutes say 5 minutes, move around your mouse randomly, then place the mouse somewhere safe like middle slightly right (center-right) of the screen, and press ‘Enter/Return’ key, this action seems to help these non-KDE desktop environments load.
– Once the Desktop appears and Welcome screen appears, it may take a while for the ‘Installer’ icon and other desktop icons to appear, please be patient and wait for these to appear (takes a maximum of 2 minutes).
– During install if live Linux OS logs out, then log-in again using the default password that is same as the username, e.g. ‘manjaro’ default username default password is ‘manjaro’, ‘parrot’ default username default password is ‘parrot’, and ‘openmandriva’ default username default password is ‘openmandriva’ etc.
– Close the welcome screen by clicking on ‘x’ of the welcome message window.
– Terminal: Open ‘Konsole’ app/software. Then sequentially type the following commands to open, edit and save the ‘bootloader.conf’ file.
cd /etc/calamares/moduleslssudo nano bootloader.conf– Terminal: In the last line of the file change,
efiBootloaderId: "ubuntu" to
efiBootloaderId: "kubuntulinos"Add the following line in the end,
installerEFIFallback: falseOn keyboard, hit ‘Ctrl+X’, ‘y’ and ‘Enter/Return’ key. Here are the details about how to use ‘nano’ text editor,
On keyboard, hit ‘Ctrl+X’, ‘y’ and ‘Enter/Return’ key. Here are the details about how to use ‘nano’ text editor,
-USE ARROW KEYS ON YOUR KEYBOARD TO NAVIGATE bootloader.conf FILE
-AFTER EDITING THE FILE IN NANO,
-PRESS Ctrl+X ON YOUR KEYBOARD
-THEN PRESS ‘Y’ ON YOUR KEYBOARD
-THEN PRESS ‘RETURN/ENTER’ KEY ON YOUR KEYBOARD
– Terminal: type the following command to close Terminal.
exit– Click Installer ‘Install Kubuntu 24.04 LTS’ > Then complete the calamares installer as follows:
– Under ‘Location’ Tab and ‘Keyboard’ Tab follow prompts to choose language, location and keyboard > Click ‘Next’
– Under ‘Customize’ Tab choose ‘Normal Installation’ > Click ‘Next’
– Under ‘Partitions’ Tab make sure correct disk is selected under ‘Select storage device’ e.g. /dev/nvme0n1 > Check ‘Replace a Partition’ > Select ‘ext4’ option > Click and select disk partition where you want to install Kubuntu OS e.g. /dev/nvme0n1p8 > Check ‘Encrypt system’ and type a password for the partition (called encryption partition) twice > Click ‘Next’
– Under ‘Users’ Tab create ‘name’, ‘username’, ‘computer name’ (ok to make all 3 same) and password > Click ‘Next’
– Under ‘Summary’ Tab click ‘Install’ and ‘Install Now’
– Under ‘Install’ Tab just wait to let installer run and complete
– Under ‘Finish’ Tab click and check ‘Restart now’ and click ‘Done’.
– When prompted to ‘Please remove installer…’, remove USB/SD live Kubuntu and press ‘Enter/Return’ key.
– Computer will reboot into the Linux OS installed in previous round, installed Kubuntu or Kubuntu OS live USB (it veries based on computer manufacturer’s BIOS software defaults).
– If/When prompted, type disk encryption key (first password). For Kubuntu OS, on older computers you will need to type the disk encryption key 3 times, then you may get message ‘password failed’, there after press ‘Esc’ key on keyboard, and when the prompt asking for encryption key appears again here type the password, and this time it will work. Then login with user password.
– On the Linux OS that opens open Terminal such as on Kubuntu OS USB Open Terminal (called Console), and type
systemctl reboot --firmware-setupwhich will take you to BIOS Settings. No need to disable ‘administrator’ and ‘user’ security password prompt, keep them on just type these passwords to enter BIOS settings.
– BIOS ‘Boot’ Tab: Click ‘UEFI Hard Disk Drive BBS Priorities’ please click, ‘Boot Option 1’ select with arrow-key and accept with ‘Return/Enter’ key, such that ‘Boot Option 1’ is ‘Kubuntu’. This will boot non-primary linux OS ‘Kubuntu’ as default linux OS, while ‘Secure Boot Disabled’ is set. To boot into this non-primary ‘Kubuntu’ linux OS with ‘Secure Boot Enabled’ you need to add MOK security signature to the grubx64.efi boot files (this will be explained in detail in another post as it requires extensive coding).
– ‘BIOS’ DO NOT Exit: To install next Linux OS, continue to next step or if this is the last linux OS you are installing continue to end of 7 linux OS installations for instructions on how to re-enable security BIOS settings.
8. Parrot Install 7th Linux OS
– BIOS Settings: No need to change anything in the ‘Secure Boot Keys’ tab, it was already done in the Boot Initial Settings, just ensure Boot order USB options are first, ‘Secure Boot Disabled’, ‘UEFI’ is selected, ‘Fast Boot Disabled’, and Bitlocker related ‘Device Guard Off/Disabled’. Put Parrot OS live USB in USB slot before clicking ‘Save and Exit’ on BIOS. As ‘USB Hard-Disk’, ‘USB CD/DVD’ and ‘CD/DVD’ are top options ahead of Hard Disk of computer, computer will boot into the USB/microSD live Parrot OS. No need to disable ‘administrator’ and ‘user’ security password prompt, keep them on just type these passwords to enter BIOS settings.
– Before Desktop and Desktop Icons appear, please note that the screen may show the following while the Desktop live environment configures for live boot, don’t be alarmed or force shut-down/power-off of the computer:
– It may happen that a ‘-‘ icon appears while rest of screen remains black, then a bunch of codes auto-run for system checks and settings configuration, please be patient and let this code run complete (takes a maximum of 2 minutes).
– (Optional 1) KDE Plasma desktop environment takes longer to load in comparison to XFCE environment. So before KDE Plasma desktop loads, the screen can go blank for several minutes after displaying message ‘configuring KDE plasma environment’. Here, after several minutes say 5 minutes, move around your mouse randomly, then place the mouse somewhere safe like middle slightly right (center-right) of the screen, and press ‘Enter/Return’ key, this action seems to help KDE plasma environment load.
– (Optional 1) Some other non-KDE Plasma desktop environment e.g. NixOS and OpenMandriva also take longer to load in comparison to XFCE environment. So before the desktop environment loads, the screen can go black or blue or pink displaying, just a circular logo (NixOS) or nothing. ere, after several minutes say 5 minutes, move around your mouse randomly, then place the mouse somewhere safe like middle slightly right (center-right) of the screen, and press ‘Enter/Return’ key, this action seems to help these non-KDE desktop environments load.
– Once the Desktop appears and Welcome screen appears, it may take a while for the ‘Installer’ icon and other desktop icons to appear, please be patient and wait for these to appear (takes a maximum of 2 minutes).
– During install if live Linux OS logs out, then log-in again using the default password that is same as the username, e.g. ‘manjaro’ default username default password is ‘manjaro’, ‘parrot’ default username default password is ‘parrot’, and ‘openmandriva’ default username default password is ‘openmandriva’ etc.
– Close if any of the welcome screen and installer opens by clicking on ‘x’ of the welcome message window. Also close the ‘Parrot Updater’ popup.
– Update the date to current date by searching in app menu ‘date & time’, click ‘apply’ and ‘ok’ if pop up ‘Update NTP service failed’ appears.
– Terminal: Open terminal ‘Konsole’ app/software. Type the following,
sudo apt updatesudo apt install grub-efi grub-efi-amd64 ntpsudo apt --fix-broken installsudo apt install grub-efi grub-efi-amd64 ntpexit– Terminal: Open ‘Konsole’ app/software. Then sequentially type the following commands to open, edit and save the ‘bootloader.conf’ file.
cd /etc/calamares/moduleslssudo nano bootloader.conf– Terminal: In the last line of the file change
installerEFIFallback: trueto
installerEFIFallback: falseOn keyboard, hit ‘Ctrl+X’, ‘y’ and ‘Enter/Return’ key. Here are the details about how to use ‘nano’ text editor,
-USE ARROW KEYS ON YOUR KEYBOARD TO NAVIGATE bootloader.conf FILE
-AFTER EDITING THE FILE IN NANO,
-PRESS Ctrl+X ON YOUR KEYBOARD
-THEN PRESS ‘Y’ ON YOUR KEYBOARD
-THEN PRESS ‘RETURN/ENTER’ KEY ON YOUR KEYBOARD
– Terminal: type the following command to close Terminal.
exit– Click Installer ‘Install Parrot’ > Then complete the calamares installer as follows:
– Under ‘Location’ Tab and ‘Keyboard’ Tab follow prompts to choose language, location and keyboard > Click ‘Next’
– Under ‘Partitions’ Tab make sure correct disk is selected under ‘Select storage device’ e.g. /dev/nvme0n1 > Check ‘Replace a Partition’ > Select ‘ext4’ option > Click and select disk partition where you want to install Parrot OS e.g. /dev/nvme0n1p9 or any ‘free space’> Check ‘Encrypt system’ and type a password for the partition (called encryption partition) twice > Click ‘Next’
– Under ‘Users’ Tab create ‘name’, ‘username’, ‘computer name’ (ok to make all 3 same) and password > Click ‘Next’
– Under ‘Summary’ Tab click ‘Install’ and ‘Install Now’
– Under ‘Install’ Tab just wait to let installer run and complete
– Under ‘Finish’ Tab click and check ‘Restart now’ and click ‘Done’.
– Computer will reboot into the Linux OS installed in previous round, installed Parrot or Parrot OS live USB (it veries based on computer manufacturer’s BIOS software defaults).
– If/When prompted, type disk encryption key (first password) and then login with user password.
– On the Linux OS that opens open Terminal such as on Parrot OS USB Open Terminal (called Console), and type
systemctl reboot --firmware-setupwhich will take you to BIOS Settings. No need to disable ‘administrator’ and ‘user’ security password prompt, keep them on just type these passwords to enter BIOS settings.
– BIOS ‘Boot’ Tab: Click ‘UEFI Hard Disk Drive BBS Priorities’ please click, ‘Boot Option 1’ select with arrow-key and accept with ‘Return/Enter’ key, such that ‘Boot Option 1’ is ‘Parrot’. This will boot non-primary linux OS ‘Parrot’ as default linux OS, while ‘Secure Boot Disabled’ is set. To boot into this non-primary ‘Parrot’ linux OS with ‘Secure Boot Enabled’ you need to add MOK security signature to the grubx64.efi boot files (this will be explained in detail in another post as it requires extensive coding).
– ‘BIOS’ DO NOT Exit: To install next Linux OS, continue to next step or if this is the last linux OS you are installing continue to end of 7 linux OS installations for instructions on how to re-enable security BIOS settings.
9. BIOS Final Settings:
– No need to remove BIOS ‘administrator’ and ‘user’ passwords, for security its best to enable these.
– Enable ‘bitlocker’ and ‘fast boot’. If secure boot is enabled only the first LinuxMint will boot, disable secure boot and change hard disk boot order to boot other six Linux OS. Its good practice to make ‘secure boot enable’ when away from computer for security reasons, while ‘secure boot disable’ is preferred when actively using the computer to avail the advantages of a multiple Linux OS system e.g. if one Linux OS experiences cyberattack, user can switch to any of the other installed Linux OS.
– Enable ‘UEFI’ boot and make hard disk (choose any one of the seven Linux OS) top boot priority over USB and CD/DVD options.
– Some Linux OS, like Manjaro and OpenMandriva, which are LUKS1 encrypted, may prompt for LUKS passphrase twice, before prompting for user login password. This is because the LUKS encrypted disk/partition contains also the boot files, so it has to be unlocked twice, first for ‘boot’ files and then for ‘root’ files. On the other hand Linux OS, like LinuxMint, which are LUKS2 encrypted, prompt for LUKS passphrase only once to unlock ‘root’ files, and ‘boot’ files are present in non-LUKS disk/partition so don’t need passphrase to unlock.
Future Directions:
1. Video demonstration of this installation is currently in editing stage. Once complete they will be uploaded and added to this article. Videos will not be uploaded on Youtube ofcourse, because there is no place for unfair (anti-trust law violators, unethical data-broker, data thieves, stalkers intruders of privacy, plagiarizing and un-F.A.I.R.) bigTech in fairwissenschaft.
2. This present ‘Demonstration 1’ is with all European Linux Operating Systems (not bigTech but betterTech from Europe) . Following this same paradigm a ‘Demonstration 2’ with all American Linux Operating Systems (not bigTech but betterTech from US) will be made, with the following U.S. Linux Operating Systems: – primary system (equivalent to LinuxMint LinuxMint Linux OS 1st install in Demonstration 1): Debian https://www.debian.org (as primary linux os, it uses debian system installer, not a type of Ubiquity/Subiquity or Calamares installer) – non-primary systems (equivalent to the 6 installs after LinuxMint Linux OS install in Demonstration 1)
– CentOS https://www.centos.org (calamares installer)
– Pure OS https://www.pureos.net (calamares installer)
– EndeavourOS https://endeavouros.com (calamares installer)
– Artix Linux https://artixlinux.org (calamares installer)
– Peppermint OS https://peppermintos.com (calamares installer)
– KaOS https://kaosx.us (calamares installer)
Please feel free to try on your own.
3. ‘Demonstration 3’ for systems that work best on whole disk so best to use them by installing on whole USB external hard disk i.e. installing from live disk as if its a computer hard disk. PuppyLinux OS https://puppylinux-woof-ce.github.io, KDE Neon Linux OS https://neon.kde.org, MX Linux OS https://mxlinux.org and Arch Linux https://archlinux.org, from Australia, Germany, U.S. and U.S. respectively. Please feel free to try on your own.
4. For those not yet ready to leave Microsoft Windows OS and Apple Mac OS, the following demonstrations will be made:
– ‘Demonstration 4’: Dual boot Windows OS and Ubuntu Linux OS
– ‘Demonstration 5’: Dual boot Mac OS and Ubuntu Linux OS
Please feel free to try on your own.